Marble Care Guide
Question: what products should I order from your Website for the proper maintenance of my newly installed marble, or for marble that has just been refinished to a brand new surface?
Answer: It is essential that a proper cleanser be used to keep the marble surface clean and sanitary. Our NeutraSheen For Marble is specifically formulated to safely clean and not harm the marbles’ surface color, clarity, or gloss. Our NeutraSheen For Marble can be purchased either premixed or concentrated.
We recommend sealing and applying our paste polish twice a year for marble vanity tops, countertops, tabletops, and bar tops. Use our Marble Guard Protector SB, a clear, deep penetrating, solvent based, impregnating sealer for polished marble; and for unpolished, honed, or tumbled marble, use our Marble Guard Protector WB, a clear, deep penetrating, water based, impregnating sealer. After applying our sealer and allowing proper penetration time one (1) hour minimum, apply our Marble Polish and Protector which enhances the marbles’ color, gloss, and repellency of water, oil, and dirt penetration.
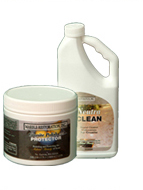
Our Instructional How To Do It DVD, shows you how to do these two preventative maintenance steps on polished marble as follows: apply a generous amount of Marble Guard Protector SB, over the entire marble surface, let it penetrate for at least one hour; next, apply a light coating of Marble Polish and Protector to an area no larger than three square feet, immediately, remove all residue of Marble Polish and Protector from the marble surface with paper towels, use a circular buffing motion to accomplish this task; next, buff this area with our Micro Fiber Mesh Hand Polishing Bonnet which you can find on our website when you click on the Supplies And Accessories category link. Our Micro Fiber Mesh Hand Polishing Bonnet can be used manually or by machine, it has a built in pouch your hand fits into and it also attaches to machines that have a velcro pad holder such as the machines contained in our marble and granite refinishing kits. After you finish polishing this first section of marble with our Marble Polish and Protector, you’re ready to repeat this same process on the next section of marble, and continue, section by section until completely finished.
Question: what products should I order from your Website for the proper maintenance of my newly installed marble floor, or for a marble floor that has just been refinished to a brand new surface?
Answer: It is essential that a proper cleanser be used to keep the marble surface clean and sanitary. Our NeutraSheen For Marble is specifically formulated to safely clean and not harm the marbles’ surface color, clarity, or gloss. Our NeutraSheen For Marble can be purchased either premixed or concentrated; our concentrated NeutraSheen For Marble is recommended for marble floor maintenance. When it comes to convenient marble care and upkeep, our Stand-Up Floor Cleaning System is extremely popular with our customers, because it is quick, easy, and efficient to use.
Question: what products should I order from your Website for the proper maintenance of my newly installed marble wall, or for a marble wall that has just been refinished to a brand new surface?
Answer: It is essential that a proper marble cleaner be used to keep the marble surface clean and sanitary. Our NeutraSheen For Marble is specifically formulated to safely clean and not harm the marbles’ surface color, clarity, or gloss. Our NeutraSheen For Marble can be purchased either premixed or concentrated. Be sure to protect your marble by sealing it with our Marble Guard Protector SB (a clear, deep penetrating, impregnating) sealant, followed by an application of our Marble Polish and Protector. Our Instructional How To Do It DVD, shows you how to do these two preventative maintenance steps as follows: apply a generous amount of Marble Guard Protector SB, over the entire marble surface, let it penetrate for at least one hour; next, apply a light coating of Marble Polish and Protector to an area no larger than three square feet, immediately, remove all residue of Marble Polish and Protector from the marble surface with paper towels, use a circular buffing motion to accomplish this task; next, buff this area with our Micro Fiber Mesh Hand Polishing Bonnet which will find in the supplies and accessories category. Our Micro Fiber Mesh Hand Polishing Bonnet can be used manually or by machine, it has a built in pouch your hand fits into and it also attaches to machines that have a velcro pad holder such as the machines contained in our marble and granite refinishing kits. After you finish polishing this first section of marble with our Marble Polish and Protector, you’re ready to repeat this same process on the next section of marble, and continue, section by section until completely finished.
Question: How do I remove the dull spots, glass ring marks, scratches, and stains from the marble surface? Marble questions and answers for vanity tops, countertops, tabletops, and bar tops (How to Clean Marble and How to Polish Marble)
Answer: All marbles are soft and porous except for the dark green species which behave like granite. What typically stains marble showers are the harsh chemicals contained in soap, shampoo, perfume, and cosmetics, the minerals in hard water, household cleaning agents which are highly acidic or alkaline in nature; all foods and beverages are not neutral when measured on the PH scale, many of which contain citric acid as a preservative.
Our Marble Refinishing Kit contains everything you will need to restore your dull, etch stained and scratched marble to a brand new, highly polished surface. The first step prior to refinishing your marble, is to watch our Instructional How To Do It DVD. After watching the DVD, you want to analyze the condition of the marble surface, using a lamp or the overhead ceiling lights, focus your vision over the dull areas, and try to see the outline of the light bulb, to determine the depth of the etching. Mark a border with duct tape around areas that are completely dull and not scratched, this border should be one and a half inches away from the dull areas, to allow for overlapping of the machine with the finer sanding discs. Start your honing process (sanding) with the 220 grit disc, followed by 400 grit, then 600 grit, and finish with 800 grit. Remember to overlap your work area by a half inch, each time you change a sanding disc grit. Remember to stop the machine every twenty seconds and clean the sanding disc with a wet sponge, check the sanding discs’ surface with your fingertips, it works best when you feel the abrasiveness of the disc.
Please note: Do not over use the sanding disc, when the face becomes smooth to the touch (it has lost its abrasiveness) it should be discarded and replaced with a new disc. For estimating purposes: one sanding disc should hone up to seven square feet of marble. Additional sanding discs can be purchased in our Supplies And Accessories section; we sell packages of (15) and (25) sanding discs; three (3) each of 150, 220, 400, 600, and 800 grit sizes and five (5) each of 150, 220, 400, 600, and 800 grit sizes, respectively.
For areas that are completely dull and scratched, start the honing process (sanding) with 150 grit, and continue as specified in the aforementioned text. Areas which are not dull or damaged should be protected with plastic sheeting applied with duct tape, prior to the honing process.
Please Note: Adhesive residue from duct tape is easily removed by using a paper towel and a small amount of lacquer thinner, or acetone (also contained in nail polish remover). Do not use lacquer thinner, or acetone on painted areas or on polyurethane which is typically on hardwood floors; use instead, a small amount of our Marble Polish and Protector or our Granite Polish and Protector, applied with a paper towel; both of these products will remove adhesive residue from duct tape without damaging paint or polyurethane.
After the honing process is completed, you can begin the polishing process using our Marble Gloss Restorer with our Ultimate Polishing Pad, remember to polish the entire surface including areas that were not honed, it is necessary to polish two and sometimes three times to achieve a brand new, highly polished look. Additional Marble Gloss Restorer can be purchased on our Website in the Marble Gloss Restorer category.
Please note: While analyzing the depth of etch marks, if you determine the etch marks are slight and not deep, some light is still reflective; then, no honing is necessary, just polish with our Marble Gloss Restorer with Ultimate Polishing Pad two to three times. Our Marble Gloss Restorer contains a fine gritty component which will remove minor scratches and water spots. Please note: Our Marble Gloss Restorer out performs any and all of our competitors polishing products; our Marble Gloss Restorer is safe and easy to use, when used with our Ultimate Polishing Pad it produces a deep, durable, high gloss finish.
When polishing the following marble species: pure white (Thassos), dark brown (Breccia Nouvella), dark green (Verde Antique), and absolute black (Belgium Black); the mineral makeup of these marbles require a different chemistry to produce a high gloss finish, which is found in our Marble Gloss Restorer SF.
Watch those food and beverage stains, water spots, dull and worn traffic areas, disappear; while the true color and brilliance of the stone is regenerated.
Please Note: When polishing marble with our Marble Gloss Restorer SF, you first make a slurry by mixing Marble Gloss Restorer SF with water, distribute the slurry over the area of marble to be polished, during the polishing process, it is normal for the slurry to dry quickly and you will notice a grabbing sensation from the machine which is caused by the friction created from using the Marble Gloss Restorer SF; do not add more water, polish this area dry for another minute or two; then, repeat this identical polishing process by adding more Marble Gloss Restorer SF mixed with water and polish the same area of marble one or two more times, before you start polishing your next section of marble.
After refinishing your marble to a brand new highly polished surface, be sure to protect your marble by sealing it with our Marble Guard Protector SB (a clear, deep penetrating, impregnating) sealant, followed by an application of our Marble Polish and Protector. Our Instructional How To Do It DVD, shows you how to do these two preventative maintenance steps as follows: apply a generous amount of Marble Guard Protector SB, over the entire marble surface, let it penetrate for at least one hour; next, apply a light coating of Marble Polish and Protector to an area no larger than three square feet, immediately, remove all residue of Marble Polish and Protector from the marble surface with paper towels, use a circular buffing motion to accomplish this task; next, buff this area with our Micro Fiber Mesh Hand Polishing Bonnet can be found on our website in the Supplies And Accessories category. Our Micro Fiber Mesh Hand Polishing Bonnet can be used manually or by machine, it has a built in pouch your hand fits into and it also attaches to machines that have a velcro pad holder such as the machines contained in our marble and granite refinishing kits. After you finish polishing this first section of marble with our Marble Polish and Protector, you’re ready to repeat this same process on the next section of marble, and continue, section by section until completely finished.
Question: How do I remove the dull spots, scratches, and stains from the marble surface? Marble questions and answers for floors and walls. Removing Spots and Stains from Marble
Answer: All marbles are soft and porous except for the dark green species which behave like granite. What typically stains marble are the harsh chemicals contained in soap, and shampoo, perfume, and cosmetics, the minerals in hard water, household cleaning agents which are highly acidic or alkaline in nature; all foods and beverages are not neutral when measured on the PH scale, many of which contain citric acid as a preservative. What typically scratches marble is the grit which is tracked in from outside, deposited on the floor from the soles of shoes and sneakers. Abrasive cleaners and cleaning pads tend to scratch and scuff marble floors and walls.
Our Marble Refinishing Kit contains everything you will need to restore your dull, etch stained and scratched marble to a brand new, highly polished surface. The first step prior to refinishing your marble, is to watch our Instructional How To Do It DVD. After watching the DVD, you want to analyze the condition of the marble surface, using a lamp or the overhead ceiling lights, focus your vision over the dull areas, and try to see the outline of the light bulb, to determine the depth of the etching. Mark a border with duct tape around areas that are completely dull and not scratched, this border should be one and a half inches away from the dull areas, to allow for overlapping of the machine with the finer sanding discs. Start your honing process (sanding) with the 220 grit disc, followed by 400 grit, then 600 grit, and finish with 800 grit. Remember to overlap your work area by a half inch, each time you change a sanding disc grit. Remember to stop the machine every twenty seconds and clean the sanding disc with a wet sponge, check the sanding discs” surface with your fingertips, it works best when you feel the abrasiveness of the disc. Please note: do not over use the sanding disc, when the face becomes smooth to the touch (it has lost its abrasiveness) it should be discarded and replaced with a new disc. For estimating purposes: one sanding disc should hone up to seven square feet of marble. Additional sanding discs can be purchased on our Website in the Supplies And Accessories category; we sell packages of (15) and (25) sanding discs; three (3) each of 150, 220, 400, 600, and 800 grit sizes and five (5) each of 150, 220, 400, 600, and 800 grit sizes, respectively. For areas that are completely dull and scratched, start the honing process (sanding) with 150 grit, and continue as specified in the aforementioned text. Areas which are not dull or damaged should be protected with plastic sheeting applied with duct tape, prior to the honing process.
Please Note: Adhesive residue from duct tape is easily removed by using a paper towel and a small amount of lacquer thinner, or acetone (also contained in nail polish remover). Do not use lacquer thinner, or acetone on painted areas or on polyurethane which is typically on hardwood floors; use instead, a small amount of our Marble Polish and Protector or our Granite Polish and Protector, applied with a paper towel; both of these products will remove adhesive residue from duct tape without damaging paint or polyurethane.
After the honing process is completed, you can begin the polishing process using our Marble Gloss Restorer with our Ultimate Polishing Pad, remember to polish the entire surface including areas that were not honed, it is necessary to polish two and sometimes three times to achieve a brand new, highly polished look. Additional Marble Gloss Restorer can be purchased on our Website in the Marble Gloss Restorer category; one pound will polish up to (160) square feet of marble.
Please note: While analyzing the depth of etch marks, if you determine the etch marks are slight and not deep, some light is still reflective; then, no honing is necessary, just polish with our Marble Gloss Restorer with Ultimate Polishing Pad two to three times. Our Marble Gloss Restorer contains a fine gritty component which will remove minor scratches and water spots. Please note: our marble polish out performs any and all of our competitors polishing products; our Marble Gloss Restorer is safe and easy to use, when used with our Ultimate Polishing Pad it produces a deep, durable, high gloss finish.
When polishing the following marble species: pure white (Thassos), dark brown (Breccia Nouvella), dark green (Verde Antique), and absolute black (Belgium Black); the mineral makeup of these marbles require a different chemistry to produce a high gloss finish, which is found in our Marble Gloss Restorer SF.
Watch those food and beverage stains, water spots, dull and worn traffic areas, disappear; while the true color and brilliance of the stone is regenerated.
Please Note: When polishing marble with our Marble Gloss Restorer SF, you first make a slurry by mixing Marble Gloss Restorer SF with water, distribute the slurry over the area of marble to be polished, during the polishing process, it is normal for the slurry to dry quickly and you will notice a grabbing sensation from the machine which is caused by the friction created from using the Marble Gloss Restorer SF; do not add more water, polish this area dry for another minute or two; then, repeat this identical polishing process by adding more Marble Gloss Restorer SF mixed with water and polish the same area of marble one or two more times, before you start polishing your next section of marble.
When polishing several rows of marble, in order to save time and be more efficient, please follow these important steps: for purposes of this discussion it is easier to explain by way of illustration. Let us visualize a section of flooring or a wall which measures twelve vertical rows of tile by twelve horizontal rows of tile or 144 square feet.
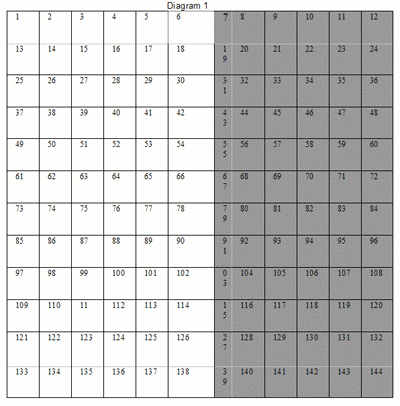
Step one: For floors and walls (using a hand held polishing machine) cut a piece of 1.5 MIL plastic sheeting and attach it to the floor or wall (depending on your project) with duct tape starting on horizontal row one at the midpoint of the seventh tile, extending it over tiles 8, 9, 10, 11, and 12, next, extend the plastic back over horizontal rows 2 through 12 (as shown in Diagram 1, below) gray shaded area. Next, extend another piece of plastic over the horizontal midpoint of row three on tiles 25, 26, 27, 28, 29, 30, and merging with tile 31 (already secured with plastic and duct tape), next, extend this piece of plastic over horizontal rows 4, 5, 6, 7, 8, 9, 10, 11, and twelve, (as shown in Diagram 3, below) gray shaded area. Be sure to secure the pieces of plastic to the marble floor or wall with duct tape. We recommend watching the marble polishing section in our Instructional How To Do It DVD another time, prior to starting Step two.
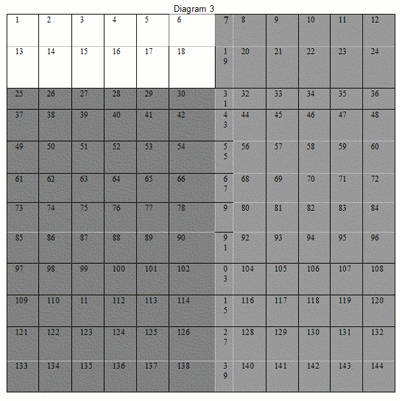
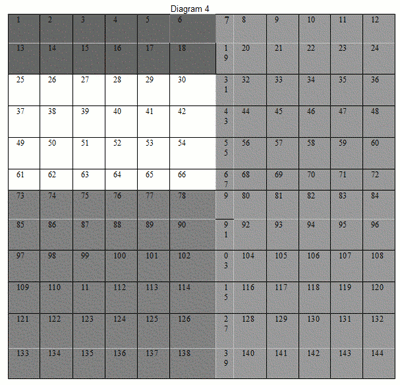
Step Two: For floors and walls (using a hand held polishing machine) such as ones contained in our Marble Refinishing Kits, the exposed (uncovered) marble tiles can now be polished, using water, our Marble Gloss Restorer with our Ultimate Polishing Pad. Start by polishing the first two and one half horizontal rows for approximately two minutes, be sure to center the polishing slurry(mixture of water and Marble Gloss Restorer ) over the tiles; after polishing the first two and one half rows, stop the machine, wipe up / rinse up the slurry from the floor or wall, and rinse with clean water three or four times, before repeating the entire polishing process one or two more times. Next, be sure the polished area is dry; then, protect with plastic sheeting, the two and one half horizontal rows by two vertical rows of polished marble. Attach the plastic sheeting to the marble floor or wall on the bottom grout joint of horizontal row two which merges with the top grout joint of horizontal row three, secure with duct tape the plastic sheeting to this grout joint; also, secure this plastic sheeting to vertical row seven, with duct tape. Next, remove the plastic sheeting from the midpoint of horizontal row three which extends to the midpoint of vertical row seven (tiles 25 to 31 1/2 down to the midpoint of tiles 61 to 67 1/2). Please note: half of tiles 25 through 31 1/2 are already polished, be sure to spend less time polishing this half row when polishing this entire section (as shown in Diagram 4, below) unshaded area. Be sure to polish this section, using the same technique as performed in the first section. When the marble floor or wall is dry; protect, section two as you did section one, prior to polishing section three (tiles 61 to to the midpoint of tile 67 down to the midpoint of tiles 97 to the midpoint of tile 103). Polish section three using the same technique as performed in the first two sections. When the marble floor or wall is dry; protect, section three as you did section one, prior to polishing the remaining tiles.
Step Three: For walls (after refinishing your marble) to a brand new highly polished surface, be sure to protect your marble by sealing it with our Marble Guard Protector SB (a clear, deep penetrating, impregnating) sealant, followed by an application of our Marble Polish and Protector. Our Instructional How To Do It DVD, shows you how to do these two preventative maintenance steps as follows: apply a generous amount of Marble Guard Protector SB, over the entire marble surface, let it penetrate for at least one hour; next, apply a light coating of Marble Polish and Protector to an area no larger than three square feet, immediately, remove all residue of Marble Polish and Protector from the marble surface with paper towels, use a circular buffing motion to accomplish this task; next, buff this area with our Micro Fiber Mesh Hand Polishing Bonnet which you can find on our website when you click on the Supplies And Accessories category link. Our Micro Fiber Mesh Hand Polishing Bonnet can be used manually or by machine, it has a built in pouch your hand fits into and it also attaches to machines that have a velcro pad holder such as the machines contained in our marble and granite refinishing kits. After you finish polishing this first section of marble with our Marble Polish and Protector, you’re ready to repeat this same process on the next section of marble, and continue, section by section until completely finished.
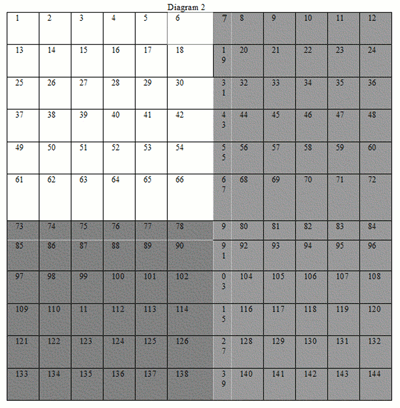
Step One: For floors (using a floor buffer) cut a piece of 1.5 MIL plastic sheeting and attach it to the floor with duct tape starting on horizontal row one at the midpoint of the seventh tile, extending it over tiles 8, 9, 10, 11, and 12, next, extend the plastic back over horizontal rows 2 through 12 (as shown in Diagram 1) gray shaded area. Next, extend another piece of plastic over the horizontal midpoint of row seven on tiles 73, 74, 75, 76, 77, 78, and merging with tile 79 (already secured with plastic and duct tape), next, extend this piece of plastic over horizontal rows 8, 9, 10, 11, and twelve, (as shown in Diagram 2, below) gray shaded area. Be sure to secure the pieces of plastic to the marble floor with duct tape. We recommend watching the marble polishing section in our Instructional How To Do It DVD another time, prior to starting Step two.
Step Two: For floors (using a floor buffer) the exposed (uncovered) marble tiles can now be polished, using water, our Marble Gloss Restorer with our Ultimate Polishing Pad. Start by polishing the first two horizontal rows for approximately two minutes, be sure to center the polishing slurry(mixture of water and Marble Gloss Restorer) over the tiles; continue polishing two more rows at a time for approximately two minutes; after polishing the first six and one half rows, stop the floor buffer, wet vacuum up or rinse up the slurry from the floor, and rinse with clean water three or four times, before repeating the entire polishing process one or two more times. Next, be sure the polished area is dry; then, protect with plastic sheeting, the six and one half horizontal rows by six vertical rows of polished marble. Attach the plastic sheeting to the marble floor on the bottom grout joint of horizontal row six which merges with the top grout joint of horizontal row seven, secure with duct tape the plastic sheeting to this grout joint; also, secure this plastic sheeting to vertical row seven, with duct tape. Next, remove the plastic sheeting from the midpoint of horizontal row seven which extends to the midpoint of vertical row seven (tiles 73 to 79 1/2 down to tiles 133 to 139 1/2). Please note: half of tiles 73 through 79 1/2 are already polished, be sure to spend less time polishing this half row when polishing this entire section (as shown in Diagram 2) gray shaded area. Be sure to polish this section, using the same technique as performed in the first section. When the marble floor is dry; protect, section two as you did section one, prior to polishing section three (tiles 7 to 12 down to the midpoint of tiles 79 to 84. Polish section three using the same technique as performed in the first two sections. When the marble floor is dry; protect, section three as you did section one, prior to polishing the remaining tiles.
Question: What products should I order from your Website to remove the dull spots, etchings, water marks, scratches, and stains from the marble surface?
Answer: All marbles are soft and porous except for the dark green species which behave like granite. What typically stains marble are the harsh chemicals contained in soap, and shampoo, perfume, and cosmetics, the minerals in hard water, household cleaning agents which are highly acidic or alkaline in nature; all foods and beverages are not neutral when measured on the PH scale, many of which contain citric acid as a preservative. What typically scratches marble is the grit which is tracked in from outside, deposited on the floor from the soles of shoes and sneakers. Abrasive cleaners and cleaning pads tend to scratch and scuff marble floors and walls.
Our Marble Refinishing Kits contain everything you will need to restore your dull, etch stained and scratched marble to a brand new, highly polished surface. All of our Marble Refinishing Kits include our Instructional How To Do It DVD.
If you have your own six (6) inch random orbit sander/polisher machine, which is Velcro backed; then, you can order either our Standard or Deluxe Marble Refinishing Kit without buffer machine, to save money.
Please Note: During the honing process, remember to overlap your work area by a half inch, each time you change a sanding disc grit. Remember to stop the machine every twenty seconds and clean the sanding disc with a wet sponge, check the sanding discs” surface with your fingertips, it works best when you feel the abrasiveness of the disc. Please note: Do not over use the sanding disc, when the face becomes smooth to the touch (it has lost its abrasiveness) it should be discarded and replaced with a new disc. For estimating purposes: one sanding disc should hone up to seven square feet of marble. Additional sanding discs can be purchased on our Website in the Supplies and Accessories category; we sell packages of (15) and (25) sanding discs; three (3) each of 150, 220, 400, 600, and 800 grit sizes and five (5) each of 150, 220, 400, 600, and 800 grit sizes, respectively. Commercial customers should call our professional sales staff at (800) 617-1779, to special order our proprietary diamond pads which are designed to resurface thousands of square feet of marble before having to be replaced.
If you determine your etch marks are slight and not deep, some light is still reflective; then, no honing is necessary, just polish by machine with our Marble Gloss Restorer and Ultimate Polishing Pad two to three times. Our Marble Gloss Restorer contains a fine gritty component which will remove minor scratches, etchings, and water spots. Please note: Our Marble Gloss Restorer out performs any and all of our competitors polishing products; our Marble Gloss Restorer is safe and easy to use, when used with our Ultimate Polishing Pad it produces a deep, durable, high gloss finish. Our Marble Gloss Restorer has its own product category, and our Ultimate Polishing Pads can be found in the Supplies and Accessories category on our Website. Our Ultimate Polishing Pads can be purchased in the following diameter sizes (inches): 6, 7 3/4, 17, and 19.
When polishing the following marble species: pure white (Thassos), dark brown (Breccia Nouvella), dark green (Verde Antique), and absolute black (Belgium Black); the mineral makeup of these marbles require a different chemistry to produce a high gloss finish, which is found in our Marble Gloss Restorer SF.
Watch those food and beverage stains, water spots, dull and worn traffic areas, disappear; while the true color and brilliance of the stone is regenerated.


